


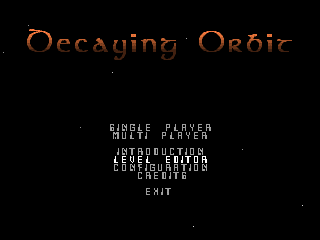
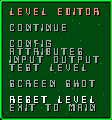
First off, if you haven't already, go to the level editor from the main menu.
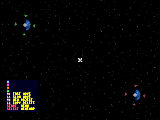
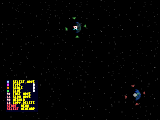
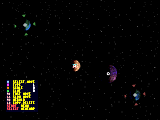
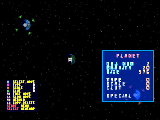
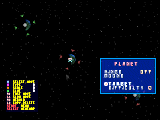
When you start it up, the level editor defaults to a boring empty level. There are only two objects: one home planet in the top left (denoted by the rotating green triangles) and one target planet (with red triangles). You control the cursor with either the d-pad or left analog stick depending if you're in digital or analog mode. Naturally analog is recommended.
Each object has a "center" sprite associated with it. These are the white circles you see over the two planets. To change anything about an object you need to first move the cursor over the center sprite of that object. When it is over a center sprite, the cursor will start pulsing a different color to let you know.
Status Box

In the bottom left corner is the status box. This tells you what all your buttons will do at any given time. Button functionality varies with the cursor location. The status box will also give you info about objects when you move the cursor over them. You can then press the corresponding buttons to change the object's properties.
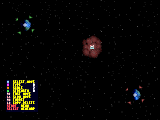
Just for grins, lets go muck with the home planet. Move the cursor so that it's over the home planet's center sprite. You'll know when you've gotten it in the correct position because the cursor will start changing colors.

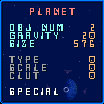
Notice how the status box in the bottom-left corner changed. You can see some of the planet's attributes like it's type, scale, and CLUT. Let's change it's color. Try pressing SQUARE a few times to cycle through the colors.
Fiddling with parameters is fun, but how do we move stuff around? The status box says it's the X button. Move the cursor to the home planet (make sure the cursor is over the center sprite). Now press and HOLD the X button. This grabs the object. You can now move it wherever you like.
You'll notice the cursor moves kind of slowly. This is necessary to get the precision you want when placing objects, but it can make moving around a large field very tedious. Try holding down the R1 button and moving. Now you're scooting along!
Similarly, release R1 and hold down L1. The cursor will move much more slowly. This is for those times when you absolutely need to place something in the correct position.
Level Attributes
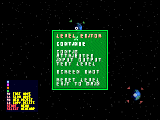
There are several attributes that affect the entire level. Move the cursor over any empty space and press start to bring up the green main menu. If you get a blue menu then your cursor must have been on an object. In this case exit out of the menu, move the cursor off the object, and hit START to get the green menu. We'll cover those blue menus a bit later.
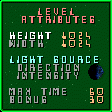
From the main menu select "ATTRIBUTES". Here you can change the level's actual size, the light source location and intensity, and the time limit for completion (as well as the limit to get the time bonus).
Change the level size to 1024x1024. Now exit the main menu and move the cursor around to see how the level has grown.
Minimap
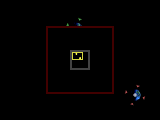
Press and hold SELECT to bring up a minimap of the level. The yellow box shows the currently displayed portion. You can move around while in this mode. Movement is super fast this way.
Creating a New Object
Before we go on, let's reset the level so we're at the same point. Open the main menu by pressing START while the cursor is over empty space. Select "RESET LEVEL" and then choose "YES" when prompted.

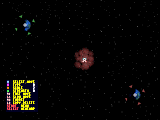
Now let's create a new planet in the middle of the screen. Move the cursor to the middle of the level. Notice how the status box says "R2 NEW OBJECT". Press R2 and voila! A new planet is born.
Now let's get really fancy. Make sure the cursor is still over your new planet's center sprite. Now the status box says "R2 NEBULA". Press R2 and you've turned your planet into a nebula! Press R2 again and it turns into a turret. In this way you can cycle through all the object types until you arrive upon the one you want.
Selecting
Let's try moving a group of objects around at the same time. First, reset the level editor as you did before: select "RESET LEVEL" from the main menu and answer "YES" when prompted.
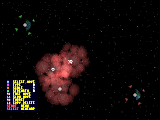
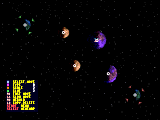
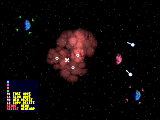
Let's place a few nebulae in the center. Move the cursor somewhere in the middle of the playfield and press R2 twice to get a nebula. If you don't get a nebula, keep pressing R2 until you do.
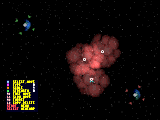
Beef up the size a bit by pressing the circle button twice. Now move the cursor over to a new empty area and press R2 once. Notice how the new object you just created is identical to the last one. Whenever you insert a new object, it takes on the attributes of the last object you touched. This is handy when you want to place several similar objects. Move the cursor and place one more.
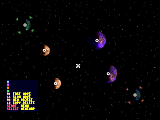
Now move the cursor over the center sprite of one of the nebulae and press X once (don't hold it down). This causes the nebula to pulsate. The pulsating lets you know which objects you have selected. Do the same thing to the other two nebulae. You should now have all three nebulae selected (pulsating).
Move the cursor over one of the nebulae center sprites, and press and HOLD the X button, just like you did before to move an object. Move the cursor around and all selected objects move at the same time.
Put them down wherever you like by releasing the X button. To deselect them, follow the same procedure as you did to select them. Press the X button once while the cursor is over the center sprites. Do this for all three nebulae so that none are selected.
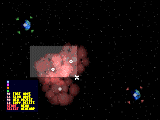
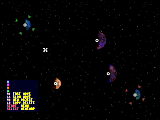
But wait! There's an even easier way to select and deselect lots of objects without having to click on each one individually. Move the cursor so that it is above and to the left of all three nebulae (NOT on a center sprite). Press and HOLD the X button. Now move the cursor down and to the right. You should see a gray box. Move the cursor until all three nebulae center sprites are within the box. Release the X button and all three nebulae are selected!
Deselecting them all is just as easy. Move the cursor over to empty space and double click the X button. POOF! They're all deselected.
Copying/Deleting
Before starting this section, reset the level editor to get a clean play field.
We'll need an object to start with. Place a new planet by moving the cursor to the center of the screen and pressing R2. If you don't have a planet, keep pressing R2 until you do.
Copying an object is very simple. The status box says "L2 COPY DELETE". Press and HOLD down L2. Move the cursor over your new planet's center sprite (are you still holding L2?) and press CIRCLE once. You can now let go of L2. Move the cursor around and you see the new object you created. Place this object somewhere close to the first one by hitting CIRCLE again to drop it (pressing X drops it too).
You can also copy multiple objects. First, let's change the attributes of one of the new planets so that we have two distinct planets. Move over one of the planet's center sprite and change the CLUT/size/type to suit your taste.
Select both of your new planets by pressing the X button on each one's center sprite (or drag a box around them both). They should now both pulsate. Press and hold L2 and press CIRCLE (it doesn't matter where the cursor is this time). Move around and you should see two new planets identical to the original two. Put them down by pressing the CIRCLE (or X) button once more.
Notice that this time it didn't matter if the cursor was over an object when you pressed CIRCLE. This is true for all of the L2 functions. You can move multiple objects in this manner as well. Select two of the four planets you created. Now move the cursor elsewhere on the screen. Hold down L2 and press SQUARE. You can move the selected objects without having to grab onto one. Press SQUARE (or X) again to drop them. There's not much difference between moving objects this way and dragging with the X button. It's just another option should you want it.
Now let's kill those new planets we just created. Move the cursor over empty space and double click the X button to deselect all objects. Next, move the cursor over one of the new planet's center sprites. Hold down L2 and press TRIANGLE to delete the object.

You can delete multiple objects the same way you copied them. Select the other three planets you created by either clicking on their center sprites or dragging a selection box around them. Once all three are selected, hold down L2 and press TRIANGLE. Answer "YES" to the prompt to delete the remaining planets.
There are two objects you can never delete. One is the home planet (every level needs a home planet). The second is the target planet, but only if it is the last target planet on the level. It is possible to have multiple target planets. If you have more than one you can delete all but the last one; you must have at least one target. The level editor will inform you when you try to violate one of these two cases.
Object-Specific Menus
If you recall a while back I mentioned something about blue menus (and how you weren't supposed to see them yet). Let's go over those now.
First, reset the level the usual way.
Create a new planet in the center of this new level. Move the cursor over the center sprite for this object and press START. Pressing START on an object brings up detailed info about it. In this case you can inspect the planet's size, gravity, CLUT, and other attributes. You can change the same attributes here that you could using the CIRCLE, SQUARE, and TRIANGLE buttons before. Play around with the type, CLUT, and scale.
Moons
The object menus also let you alter other things about the planet. For instance, we can give our planet moons. If you're not in the planet menu, press START over a planet's center sprite to bring it up.
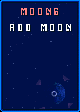
Go down and select "SPECIAL". Pick "MOONS" and then "ADD MOON". A moon appeared revolving around the planet. Also, the line "MOON 1" appeared in the menu. Select "MOON 1" to inspect the moon's attributes.

You'll notice the same three attributes as with the planet: type, scale, and CLUT. In addition, you can change the moon's distance from the planet, and the speed at which it revolves.
Go back one menu and add another moon. Now select "MOON 2" to change that moon's attributes. You'll notice that while you're editing a moon's parameters, the moon in question is pulsating. This lets you know which one you're changing.
Each planet can have up to 8 moons.
Multiple targets
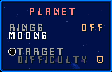
Go back to the first planet menu and select "SPECIAL" again. Let's make this planet a target. Move down to "TARGET" and select it. Red triangles appeared around the planet to let you know it's now a target. The line below "TARGET" also became active. You can change the target's difficulty this way. Check out the Level Editor Reference Manual for an explanation about difficulty.
Level Editor Configuration
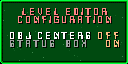
To change some things about the level editor itself, bring up the main menu and select "CONFIG". Here you can turn on/off the status box and the object center sprites. Do what suits your taste.
Note that if you have center sprites turned off, they will still pop up when the cursor gets close by. Give it a shot to see what I mean. Create a bunch of objects. Now go into the main menu and change "OBJ CENTERS" to "OFF". Exit out and move around the level. When you get close to an object, it's center pops up. Kinda spiffy huh?
The End
That's it for the tutorial! Read the Reference Manual to get info on all the object types and their parameters. Have fun making levels!
Top