
| About DSI |
| Staff |
| What's new |
| News archive |
| Atom feed |
| Video blog |
|
Games |
|
Yaroze Classics 2006 - NUON DOWNLOAD (3.8 MB) FEATURING KATAPILA INVS BREAKDOWN |
|
Decaying Orbit OFFICIAL SITE 2004 - NUON v1.0 DOWNLOAD (993 kB) 1999 - PSOne DOWNLOAD NTSC (515 kB) DOWNLOAD PAL (516 kB) |
|
Chomp mods v1.4E TOURNAMENT EDITION 2002 - NUON DOWNLOAD (573 kB) SOURCE CODE (691 kB) SUBMIT HIGH SCORE LEVEL EDITOR HOW-TO |
|
Mega-Gun 1988 - C64 DOWNLOAD (19 kB) |
|
NUON Games & Demos 2005 - NUON PURCHASE |
|
Utilities |
|
NUON Tools HOMEBREW SDK DOWNLOAD (32 MB) AUTHENTICATION TOOLS DOWNLOAD (39 MB) |
|
SDK+more LINK (torrent - 204 MB) |
|
libsprite2 2002 - NUON DOWNLOAD (30 kB) |
|
libsynth2 2004 - NUON DOWNLOAD (1.1 MB) |
|
Boot Loader v4.0 2006 - NUON DOWNLOAD (3.6 MB) SOURCE CODE (6.4 MB) |
|
Nuance SOURCE CODE (16 MB) |
|
Info |
|
Burning Tips HOW TO BURN A NUON HOMEBREW TO CD-R |
|
|
|
Links |
   |
Internal Link
(opens in same window)
External Link
(opens in new window)
Broken Link
(likely 404 error)
|
|
|
Version 1.4 of Chomp introduces an in-game level editor. This allows you to create nearly any level you can imagine. Several tools let you manipulate the mazes you construct and make their creation much easier. You can also test them to make sure they work as you expect.
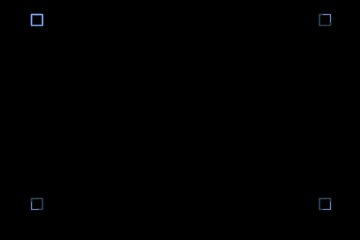
Start the level editor from the main menu and you will be presented with this screen. This represents an empty playfield. The four L-shaped brackets show the corners of the maze. The four squares are your cursors for inserting new maze elements. The brightest one is the cursor you control while the other three are for mirroring the elements. You can toggle mirroring on and off from the command menu (see below). Use either the analog stick or the d-pad to move around.
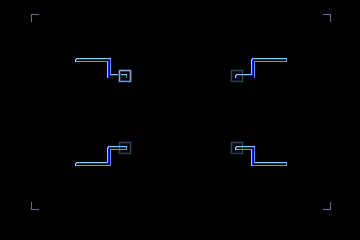
The A Button
The A button toggles walls on/off at the cursor position. Press and hold the A button and move around to create a connected sequence of walls. If you are on a wall when you press A you will be in "remove wall" mode. Moving around now will erase walls rather than place them.
When either placing or erasing walls with the A button you will not be able to affect other maze elements. To do so you must be in "Overwrite" mode (see the command menu below).
The B Button
The B button is the general delete button. Use it to erase any maze elements.
The C Buttons
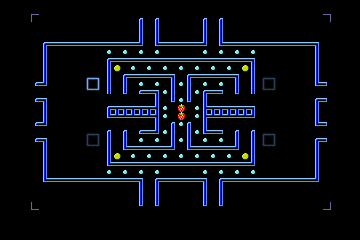
The C buttons place and remove other maze elements.
- C-down: Pills
- C-right: Fruit
- C-up: Power pills
- C-left: Slow tile toggle (See section about the NUON button)
Similar to placing maze walls, if you press the corresponding button while on that maze element it will delete the element. Hold it down and move around to delete that type of element as you move. You will not delete other element types unless you are in "Overwrite" mode.
The L & R Buttons
Place a player start location with the L shoulder button. If one already exists it will be moved to the new location.
Enemy start locations are placed and removed with the R shoulder button. These are not mirrored.
The Command Menu
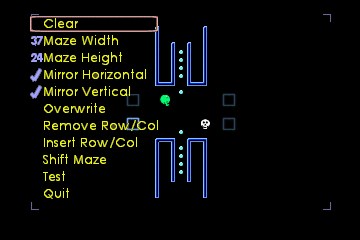
Press START to bring up the command menu. Use the stick/pad to navigate and the A button to select. The B button exits the menu. Following is a summary of the various actions you can perform.
Clear. Clears the current maze. You must press the A button twice to confirm the clear.
Maze Width. Changes the maze width. After pressing A press left/right to lower/raise the width. The maximum width is 37. Press A again to make the change or B to cancel. WARNING: Reducing the width will cut off the right side of any maze you have drawn.
Maze Height. Changes the maze height. After pressing A press left/right to lower/raise the height. The maximum height is 24. Press A again to make the change or B to cancel. WARNING: Reducing the height will cut off the bottom of any maze you have drawn.
Mirror Horizontal. Toggle switch to enable/disable mirroring in the horizontal direction while drawing. Default is enabled.
Mirror Vertical. Toggle switch to enable/disable mirroring in the vertical direction while drawing. Default is enabled.
Overwrite. Toggle that enables/disables the ability to draw over one maze element type with another. Default is disabled.
Remove Row/Col. Removes a row or column from your maze at the current cursor position and compresses the remaining rows/columns inward. Press left or right to remove a column. Press up or down to remove a row. If the mirror toggles are enabled, removing a row/column from one side will automatically remove it from the other. Note this does not affect the overall maze dimensions - empty rows/columns are added at the edges.
Insert Row/Col. Inserts a blank row or column at the current cursor position and pushes the remaining rows/columns outward. Press left or right to insert a column. Press up or down to insert a row. If the mirror toggles are enabled, inserting a row/column to one side will automatically insert it to the other. Note this does not affect the overall maze dimensions - empty rows/columns are added at the point of insertion.
Shift. Press the stick/pad in any direction to offset the maze. Maze elements will wrap around.
Test. Play the maze. Make sure you have a starting position and at least one pill, power pill, or fruit.
Quit. Return to the main menu. You can come back to the level editor later and your maze will be intact.
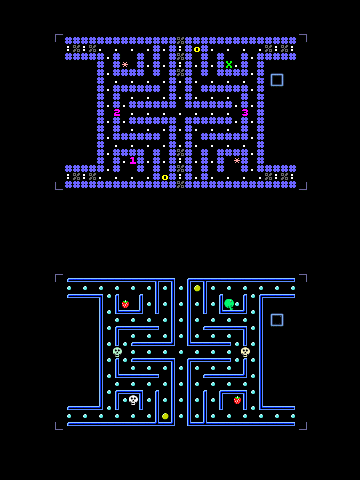
The NUON Button
The NUON button swaps between normal maze graphics and their corresponding ASCII characters. Use the ASCII chars when you are ready to transcribe the maze into the "levels.h" header file.
Note the ASCII mode is the only way you can tell the difference between slow tiles and normal tiles. In the maze to the right, note the slow tiles in the warp tunnels.
If you are running Chomp in the emulator you are also able to print out the level text for easy cut-and-paste into the header file. To do this, hold down the NUON button. Then press L & R. The maze output will be printed to the emulator's STDOUT window. On real hardware this feature is disabled since it will just hang the system.
The ASCII characters are listed below for reference.
| Color | Maze element | |
| Green upper-case X | Chomp start | |
| Pink number | Enemy start | |
| Blue number sign | Wall | |
| White period | Pill | |
| Yellow lower-case O | Power pill | |
| Red star | Fruit | |
| Gray percent | Empty slow tile | |
| White colon | Pill (on slow tile) | |
| Yellow "at" sign | Power pill (on slow tile) | |
| Red dollar sign | Fruit (on slow tile) |
Things you cannot do, but it would be nice
Specific walls. It is not possible to insert the specific wall elements using the level editor. These are the elements labeled "A" through "P". If you wish to use them you will need to insert them manually after transcription.
Loading levels. It would be cool to load the existing levels into the level editor to play around.
Make slow tiles visible in editor. It's mildly annoying that you can't see the slow tiles without switching to ASCII mode.
Comments/clarifications/typos
